![[Google VP9] Bitrate Modes in Detail](https://thuannguyen.net/wp-content/uploads/2019/11/googel-vp9.jpg)
This document details other practical ways you can tailor VP9 bitrates to optimize for a variety of scenarios. The examples below use FFmpeg.
Compression
Video compression technologies such as VP9 aim to reduce the amount of data required to convey an intelligible picture and sense of motion to end users.
One of the key techniques used to achieve this is quantization. A quantizer mathematically simplifies various digitized elements of the image. For example it may reduce the range of colors used, and further may perform mathematical functions on the data to “smooth out” the perceived lack of fine resolution within the reduced color range. There are many such functions.
Quantization (or “Q”) is well outlined in its Wikipedia article.
In VP9, quantization is performed on the transform coefficients. This reduces the required bitrate to maintain perceived quality, by adding to the encoding.
Ultimately when there is more quantization (a higher Q number), details are lost and quality is lower, but less data is required to store the frame. In most cases, the VP9 encoder achieves its bitrate goals by changing Q over time, depending upon the complexity of each frame.
Use case optimization
To allow the user to “tune” VP9 compression to their specific needs it is possible to adjust the balance of quality and bitrate at the time of initial compression through a number of programing interfaces.
The encoder has a sliding tradeoff between speed, quality, and bitrate.
- If a user is focussed on quality, they must either be prepared for longer encode times or to provide faster and more abundant processing resources.
- If a user is focussed on ensuring the output VP9 encoded file is small and can be delivered quickly, they must be prepared to reduce the amount of time that the image can be processed by the quantizer, and this will result in a lower detail to which the quantizer can work.
- If a user is purely focussed on delivery speed (for example in a live webcast or a two-way video conference) then quantization may be completely subordinate to constraints on the rate at which usable bytes of data can be conveyed over a network (that is, “bitrate”).
The correct choice will be highly specific to each use case. To make it simpler to adjust this balance to your use case, VP9 supports straightforward configuration in four “bitrate modes.”
VP9 bitrate modes
Let us start by taking a look at the main bitrate modes that VP9 supports:
| Mode | |
|---|---|
| Constant Quantizer (Q) | Allows you to specify a fixed quantizer value; bitrate will vary |
| Constrained Quality (CQ) | Allows you to set a maximum quality level. Quality may vary within bitrate parameters |
| Variable Bitrate (VBR) | Balances quality and bitrate over time within constraints on bitrate |
| Constant Bitrate (CBR) | Attempts to keep the bitrate fairly constant while quality varies |
Q
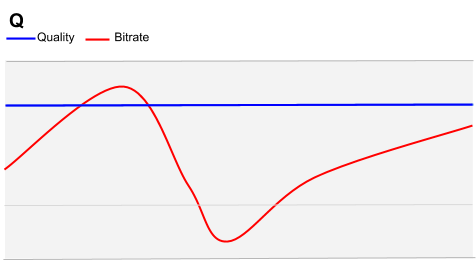
Constant Quantizer mode is a good choice for scenarios where concerns about file-size and bitrate are completely subordinate to the final quality.
Use cases for Q settings may be found in digital cinema, digital edit suites or digital signage applications, where the content can be delivered on a physical storage medium or over unconstrained time — well in advance of the content actually being used, and where the desired output must be of highest visual quality.
VP9 Q mode bitrate optimization
Constant Quantizer mode requires minimal configuration. As its name suggests, Q mode is focussed on maintaining the quantizer at a target “quality” level, and allowing the quantizer to determine the flow of data that it wishes to process. All that the user need define is the target quality.
Use the following FFmpeg command-line parameters for Q mode bitrate optimization:
| ffmpeg | |
|---|---|
-b:v 0 | By marking the video bitrate as 0 we explicitly set “Q” mode |
-g <arg> | Sets Keyframe Interval in frames (defaults to 240) |
-crf <arg> | Sets maximum quality level. Valid values are 0-63. Lower numbers are higher quality |
-quality good -speed 0 | Default and recommended for most applications. best is more of a research tool, with marginal improvement over -quality good -speed 0 |
-lossless | Lossless mode |
Q mode bitrate : FFmpeg examples
The first example is a very extreme Q mode setting and is provided for illustration only. (Even processing the 120 second clip in these examples will take several hours, and the output file produced is typically much larger than the original source.)
ffmpeg -i 120s_tears_of_steel_1080p.webm -c:v vp9 -g 1 -b:v 0 -crf 0 -quality good \
  -speed 0 -lossless 1 -c:a libvorbis Q_g_1_crf_0_120s_tears_of_steel_1080p.webm.webm
To compare the effect of -crf, the following examples vary only -crf. Note that -g is not defined, so will default to 240, and in practice -crf defaults to 10, so we would have had the same result without including either parameter in the second of the three examples:
ffmpeg -i 120s_tears_of_steel_1080p.webm -c:v vp9 -b:v 0 -crf 0 -quality good \
  -speed 0 -c:a libvorbis Q_crf_0_120s_tears_of_steel_1080p.webm
ffmpeg -i 120s_tears_of_steel_1080p.webm -c:v vp9 -b:v 0 -crf 10 -quality good \
-speed 0 -c:a libvorbis Q_crf_10_120s_tears_of_steel_1080p.webmffmpeg -i 120s_tears_of_steel_1080p.webm -c:v vp9 -b:v 0 -crf 63 -quality good \
-speed 0 -c:a libvorbis Q_crf_63_120s_tears_of_steel_1080p.webmThe output of these examples differs in size on disk. With -crf set to 0 the file was 711.8MB, with -crf set to 10 the file size was 125.3MB, and with -crf set to 63 the file was 4.5MB. In very simple terms this highlights that we have reduced the quality of the resulting VP9-encoded file by raising the value of the -crf argument. A full summary of all output files is in the Table of Results below.
Let us now compare the effect of varying the -g setting.
ffmpeg -i 120s_tears_of_steel_1080p.webm -c:v vp9  -g 1 -b:v 0 -quality good \
  -speed 0  -c:a libvorbis Q_g_1_120s_tears_of_steel_1080p.webm
ffmpeg -i 120s_tears_of_steel_1080p.webm -c:v vp9 -g 240 -b:v 0 -quality good \
-speed 0 -c:a libvorbis Q_g_240_120s_tears_of_steel_1080p.webmffmpeg -i 120s_tears_of_steel_1080p.webm -c:v vp9 -g 480 -b:v 0 -quality good \
-speed 0 -c:a libvorbis Q_g_480_120s_tears_of_steel_1080p.webmWe notice that the -g 1 setting produces a very large file, 25.9MB in size. Compare this to changing -g 240 (explicitly setting the same as the default) where we end up with a 4.5MB file, and -g 480 where we end up with a 4.4MB file.
CQ
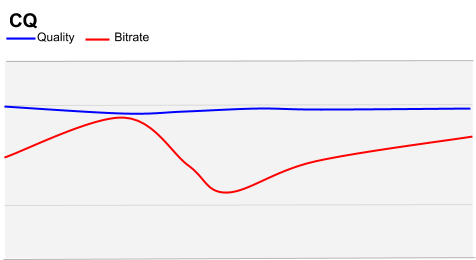
CQ is a recommended mode for file-based video.
For most content types, we recommend using constrained quality (CQ) mode, with bitrate caps. Most videos contain a mix of high-motion scenes (e.g., action sequences) and scenes with less detail (e.g., conversations). CQ mode allows the encoder to maintain a reasonable quality level during longer, easier scenes (without wasting bits), while allocating more bits for difficult sequences.
Nonetheless we must still constrain the process by providing an upper range — otherwise there may as well be no compression at all! We can also set a lower range, where even if the image is black and the encoding process has almost nothing to do we will still throughput that data, perhaps less efficiently than we could, but with the end result that even the black is not significantly compressed and look “very black”.
In addition we must also set the quantizer threshold. In VP9 the quantizer threshold can be varied from 0 down to 63.
The following FFmpeg command-line parameters are used for CQ mode:
| ffmpeg | |
|---|---|
-b:v <arg> | Sets target bitrate (e.g. 500k) |
-minrate <arg>-maxrate <arg> | Sets minimum and maximum bitrate. |
-crf <arg> | Sets maximum quality level. Valid values are 0 to 63, lower numbers are higher quality. |
CQ bitrate mode: FFmpeg examples
The first example provides a reasonably wide constraint. Compared to the examples given above for Q, however, we find that this forces the bitrates into a higher range and the output quality is notably higher. File size is notably larger.
ffmpeg -i 120s_tears_of_steel_1080p.webm -c:v vp9 \
  -minrate 1000k -maxrate 4000k -crf 10  -c:a libvorbis \
  CQ_4000_1000_crf_10_120s_tears_of_steel_1080p.webm
The output file in this instance was 20.2MB on disk — noticeably smaller than the Q mode encode in the examples above.
In contrast for the next example we have constrained the bitrate to a much more closely-defined range.
ffmpeg -i 120s_tears_of_steel_1080p.webm -c:v vp9 \
  -minrate 1500k -maxrate 2500k -crf 10  -c:a libvorbis \
  CQ_2500_1500_crf_10_120s_tears_of_steel_1080p.webm
In this instance the output file size was 24.1MB, and at times of high complexity and motion the video quality is visibly reduced when compared to the previous example.
ffmpeg -i 120s_tears_of_steel_1080p.webm -c:v vp9 \
  -minrate 750k -maxrate 1400k -crf 10  -c:a libvorbis \
  CQ_1400_750_crf_10_120s_tears_of_steel_1080pp.webm
In this final example, the output was significantly reduced in size, dropping to 13.2MB on disk.
VBR
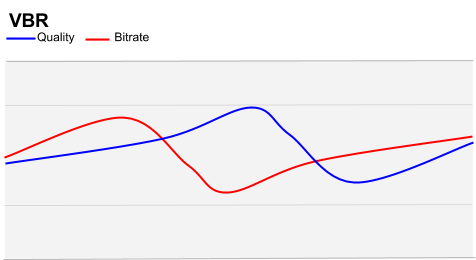
Variable bitrate mode (VBR) is recommended for streaming video-on-demand files of high-motion content (for example sports). It is well suited to HTTP-based delivery.
In a VBR model, action scenes may be encoded with a higher bitrate than “easier” scenes, which are consistent with the keyframe.
For large streaming delivery models, VBR benefits can add up significantly in both distribution and infrastructure terms. When many VBR streams are being delivered by the same infrastructure, this can provide benefits to all viewers using the system.
VP9 VBR is also recommended for encoding sports and other content with high motion. For such high-complexity content, VBR achieves higher quality during periods of lower motion.
The following FFmpeg command-line parameters are used for VBR mode:
| ffmpeg | |
|---|---|
-quality good | If this is present then FFmpeg will take into account the subsequent -speed setting |
-speed <arg> | For VIDEO ON DEMAND Valid values are 0-4, with 0 being the highest quality and 4 being the lowest. (For Live streaming the range is 5-8 – See CBR below) |
VBR bitrate mode: FFmpeg examples
ffmpeg -i 120s_tears_of_steel_1080p.webm -c:v vp9 \
  -minrate 1500k -maxrate 2500k -quality good -speed 0  -c:a libvorbis \
  VBR_good_0_120s_tears_of_steel_1080p.webm
ffmpeg -i 120s_tears_of_steel_1080p.webm -c:v vp9 \
-minrate 1500k -maxrate 2500k -quality good -speed 5 -c:a libvorbis \
VBR_good_5_120s_tears_of_steel_1080p.webmffmpeg -i 120s_tears_of_steel_1080p.webm -c:v vp9 \
-minrate 1500k -maxrate 2500k -quality good -speed 8 -c:a libvorbis \
VBR_good_8_120s_tears_of_steel_1080pp.webmCBR
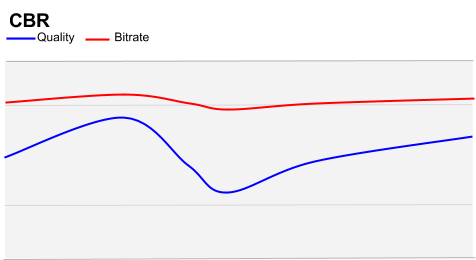
Constant Bitrate mode (CBR) is recommended for live streaming with VP9.
CBR essentially sets the upper bitrate as a “hard ceiling”. This means that the encoding process cannot produce data at a rate that the network cannot carry.
For example, for real-time communication (video conferencing) streams it is important that the encoding application does not flood the network with more data than it can carry. If it does, audio/video sync issues or frozen frames significantly affect user experience, more so than reduced compression efficiency. By ensuring the hard ceiling is defined, VP9 will reduce quality as that ceiling is reached.
The following FFmpeg command-line parameters are used for CBR mode:
| ffmpeg | |
|---|---|
-quality realtime | If this is present then FFmpeg will take into account the subsequent -speed setting |
-speed <arg> | For live streaming Valid values are 5 to 8, with 5 being the highest quality and 8 being the lowest. (For Video On Demand these are 0 to 4. See VBR above.) |
-minrate <arg>-maxrate <arg> | Sets minimum and maximum bitrate ** These must be set to the same -b:v bitrate value for CBR mode** . |
In very simple terms we fix the target, minimum and maximum bitrates to the same value, and tell the quantizer that the operations are time-sensitive.
CBR bitrate mode: FFmpeg examples
The examples below explore setting the bitrate to 2Mbps and 500kbps targets:
ffmpeg -i 120s_tears_of_steel_1080p.webm -c:v vp9  -b:v 2000k \
  -minrate 2000k -maxrate 2000k -quality realtime -speed 0 -c:a libvorbis \
  CBR_2000_realtime_0_120s_tears_of_steel_1080p.webm
ffmpeg -i 120s_tears_of_steel_1080p.webm -c:v vp9 -b:v 2000k \
-minrate 2000k -maxrate 2000k -quality realtime -speed 5 -c:a libvorbis \
CBR_2000_realtime_5_120s_tears_of_steel_1080p.webmffmpeg -i 120s_tears_of_steel_1080p.webm -c:v vp9 -b:v 2000k \
-minrate 2000k -maxrate 2000k -quality realtime -speed 8 -c:a libvorbis \
CBR_2000_realtime__8_120s_tears_of_steel_1080p.webmffmpeg -i 120s_tears_of_steel_1080p.webm -c:v vp9 -b:v 500k \
-minrate 500k -maxrate 500k -quality realtime -speed 0 -c:a libvorbis \
CBR_500_realtime__0_120s_tears_of_steel_1080p.webmffmpeg -i 120s_tears_of_steel_1080p.webm -c:v vp9 -b:v 500k \
-minrate 500k -maxrate 500k -quality realtime -speed 5 -c:a libvorbis \
CBR_500_realtime_5_120s_tears_of_steel_1080p.webmffmpeg -i 120s_tears_of_steel_1080p.webm -c:v vp9 -b:v 500k \
-minrate 500k -maxrate 500k -quality realtime -speed 8 -c:a libvorbis \
CBR_500_realtime_8_120s_tears_of_steel_1080p.webmResults
Each of the above encodes was performed on an Ubuntu Linux system with the following specifications:
- Processor: 4x Intel(R) Core(TM) i5-6500 CPU @ 3.20GHz
- Memory (RAM): 8060MB (1492MB used)
- Graphics: Intel HD Graphics 530 (Skylake GT2)
- OS: Ubuntu 16.04 LTS
The source file in all cases was a one minute, twenty second (1:20) clip culled from Tears Of Steel.
It was noticeable that setting -speed values above 5 transforms VP9 processing speed. While this is a considerable increase in quantization (seen by the strongly “dithered” effect on the very low quality fast bitrates), VP9 is still able to produce a very good low bitrate 1080p output, albeit better suited for smaller mobile devices than larger displays.
Considerations for use cases with re-scaling (re-sizing)
VP9’s bitrate modes are obviously not isolated, and may be combined with many other arguments and parameters to specifically target use cases. One typical use case may be to re-scale the output video’s dimensions, to target a specific device.
A classic example of this would be changing an HD stream to an SD output. Again this will have significant effects on the processing time and the output bitrate. In a scenario where two FFmpeg commands are otherwise identical, merely adjusting the size of the output video will change the size of the resulting file, and indeed its bitrate in a streaming model.
To exemplify this we have taken a mid-point example from each of the bitrate modes and simply added rescaling parameters.
Q mode
ffmpeg -i 120s_tears_of_steel_1080p.webm -c:v vp9 -b:v 0 -crf 10 -quality good \
  -speed 0 -vf scale=640x480 -c:a libvorbis 640x480_Q_crf_10_120s_tears_of_steel_1080p.webm
CQ mode
ffmpeg -i 120s_tears_of_steel_1080p.webm -c:v vp9 \
  -minrate 1500k -maxrate 2500k -crf 10 -vf scale=640x480 -c:a libvorbis \
  640x480_CQ_crf_0_120s_tears_of_steel_1080p.webm
VBR mode
ffmpeg -i 120s_tears_of_steel_1080p.webm -c:v vp9 \
  -minrate 1500k -maxrate 2500k -quality good -speed 5 -vf  scale=640x480 \
  -c:a libvorbis 640x480_VBR_good_5_120s_tears_of_steel_1080p.webm
CBR mode
ffmpeg -i 120s_tears_of_steel_1080p.webm -c:v vp9  -b:v 2000k \
  -minrate 2000k -maxrate 2000k -quality realtime -speed 5 -vf  scale=640x480 \
  -c:a libvorbis 640x480_CBR_2000_realtime_5_120s_tears_of_steel_1080p.webm
Table of results for rescaling
| File | Encode Mins | File Size On Disk |
|---|---|---|
| 640x480_Q_crf_10_120s_tears_of_steel_1080p.webm | 5 | 3.4MB |
| 640x480_CQ_crf_0_120s_tears_of_steel_1080p.webm | 2 | 22.4MB |
| 640x480_VBR_good_5_120s_tears_of_steel_1080p.webm | 1 | 22.6MB |
| 640x480_CBR_2000_realtime_5_120s_tears_of_steel_1080p.webm | 4 | 23MB |
For ease of comparison these are the same FFmpeg commands from our earlier examples but without the scaling:
| File | Encode Mins | File Size On Disk |
|---|---|---|
| Q_crf_10_120s_tears_of_steel_1080p.webm | 56 | 126MB |
| CQ_2500_1500_crf_10_120s_tears_of_steel_1080p.webm | 9 | 24.1MB |
| VBR_good_5_120s_tears_of_steel_1080p.webm | 4 | 23.9MB |
| CBR_2000_realtime_speed_5_120s_tears_of_steel_1080p.webm | 1 | 24.8MB |
As you will see, there is a notable reduction in output file sizes for each, and while there is in most examples a reduction in the encode time, in Q mode the encode time actually increased. Compressing a video “more” requires more effort, so even if the output file is expected to be smaller if quality is unconstrained (as it is in Q mode), this may actually increase the time taken to produce the output file. Do not assume that a smaller file can always be delivered faster by the encoding process.
Rescaling and reducing bitrate in combination
As a final comparison the following examples re-run the CQ, VBR and CBR examples of rescaling, but this time we constrain the target bitrate to a level of 500kbps — roughly a quarter (in line with the scaling down of the image size).
CQ mode
ffmpeg -i 120s_tears_of_steel_1080p.webm -c:v vp9 \
  -minrate 350k -maxrate 550k -crf 10 -vf  scale=640x480 -c:a libvorbis \
  640x480_CQ_crf_0_120s_tears_of_steel_1080p.webm
VBR mode
ffmpeg -i "120s_tears_of_steel_1080p.webm" -c:v vp9 \
  -minrate 350k -maxrate 500k -quality good -speed 5 -vf scale=640x480 -c:a libvorbis \
  640x480_VBR_good_5_120s_tears_of_steel_1080p.webm
CBR mode
ffmpeg -i 120s_tears_of_steel_1080p.webm -c:v vp9  -b:v 500k \
  -minrate 500k -maxrate 500k -quality realtime -speed 5 -vf scale=640x480 -c:a libvorbis \
  640x480_CBR_2000_realtime_5_120s_tears_of_steel_1080p.webm
Table of results for rescaling and lowering target bitrate
| File | Encode Mins | File Size On Disk |
|---|---|---|
| 640x480_CQ_500_crf_0_120s_tears_of_steel_1080p.webm | 1 | 7MB |
| 640x480_VBR_500_good_5_120s_tears_of_steel_1080p.webm | 1 | 7MB |
| 640x480_CBR_500_realtime_5_120s_tears_of_steel_1080p.webm | 1 | 7.6MB |
As you can see, encode time has been further shortened.


